

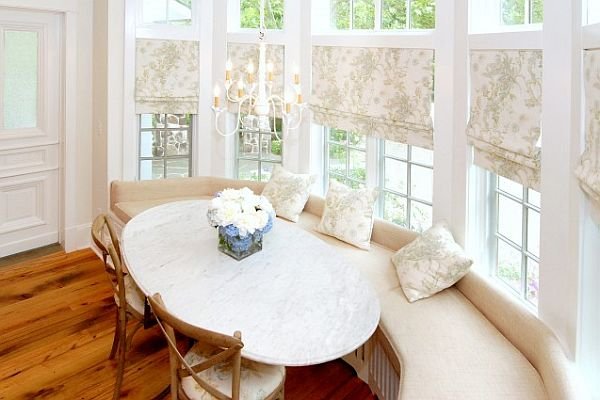
A breakfast nook is one of the smartest ways to add charm, seating, and functionality to your kitchen or dining area. It creates a cozy spot for morning coffee, casual meals, homework time, or even working from home. The best part? You don’t need a massive budget or advanced carpentry skills to build one yourself.
This step-by-step DIY guide from LivinHint walks you through planning, building, and finishing a breakfast nook that fits your space perfectly.
Key Takeaways
- A breakfast nook maximizes unused kitchen corners and adds functional seating
- Proper measurements ensure comfort and prevent crowding
- Securing the bench to wall studs increases stability
- Storage benches add hidden functionality
- Cushions and lighting elevate comfort and style
- DIY breakfast nooks are budget-friendly compared to custom built-ins
What Is a Breakfast Nook?
A breakfast nook is a small seating area, typically built into a corner or along a wall, designed for casual dining. Most nooks include a built-in bench, a table, and sometimes extra storage underneath the seating.
Breakfast nooks are especially popular in kitchens with unused corners or awkward layouts, where traditional dining furniture may feel bulky or inefficient.
Planning Your Breakfast Nook
Before picking up tools, planning is crucial. A well-planned nook looks intentional and feels comfortable rather than cramped.
Start by choosing the location. Corners near windows work best because they provide natural light and a cozy atmosphere. Measure the available space carefully, including wall length, depth, and ceiling height.
Decide whether you want:
- A single bench against one wall
- An L-shaped corner bench
- A U-shaped nook for larger families
Also think about storage. Lift-up bench seats are great for hiding kitchen items, kids’ supplies, or seasonal décor.
Tools and Materials You’ll Need
The exact materials depend on your design, but most DIY breakfast nooks require basic supplies.
Common Materials & Estimated Cost
| Item | Purpose | Estimated Cost |
| Plywood (¾”) | Bench frame and seating | $50–$90 |
| 2×4 lumber | Structural support | $30–$60 |
| Wood screws | Assembly | $10–$15 |
| Wood glue | Added strength | $5–$10 |
| Hinges (optional) | Storage seats | $10–$25 |
| Foam cushions | Seating comfort | $40–$80 |
| Fabric or upholstery | Cushion cover | $30–$70 |
| Paint or stain | Finishing | $20–$40 |
Tools:
- Tape measure
- Level, drill
- Saw
- Sander
- Screwdriver
- Clamps
- Paintbrush
- Roller
Step-by-Step: How to Build a Breakfast Nook
Step 1: Measure and Mark the Layout
Use painter’s tape to outline the nook on the floor and walls. This helps you visualize spacing and ensures your bench won’t block walkways, cabinets, or doors.
A comfortable bench depth is 18–20 inches, and the seat height should be 17–19 inches, similar to a standard chair.

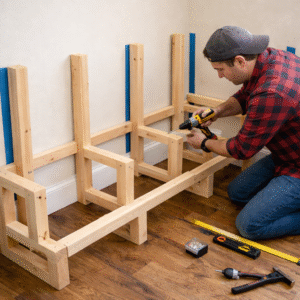
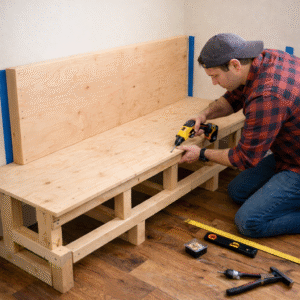
Step 2: Build the Bench Frame
Start by constructing the base frame using 2×4 lumber. This frame supports weight and keeps the bench sturdy.
Secure the frame to wall studs whenever possible for extra stability. Use a level throughout this step to ensure the bench sits evenly.
For corner nooks, build each section separately, then connect them tightly at the corner.
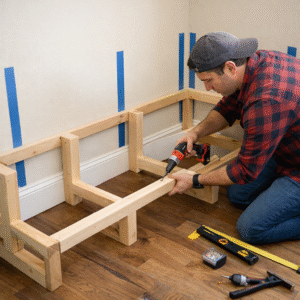
Step 3: Add Vertical Supports
Install vertical supports inside the frame every 12–16 inches. These prevent sagging and strengthen the structure.
If you’re planning storage, leave enough clearance inside the bench for bins or open space.
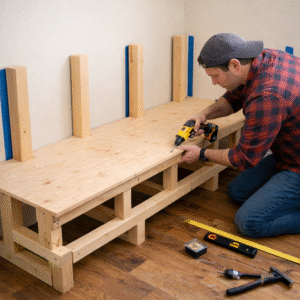
Step 4: Attach the Bench Seat
Cut plywood to size for the bench top. If you want storage, attach the seat using hinges so it lifts easily.
Sand all edges thoroughly to avoid splinters and rough corners.
Step 5: Build the Bench Back (Optional)
A backrest adds comfort and visual balance. Attach vertical boards or a solid plywood panel to the wall behind the bench.
A slight angle (around 10–15 degrees) makes the bench more comfortable for sitting longer periods.
Step 6: Fill, Sand, and Prep
Fill screw holes and seams with wood filler. Once dry, sand everything smooth.
This step is key for a professional, built-in look.
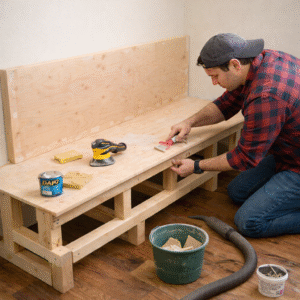
Step 7: Paint or Stain the Nook
Choose a finish that matches or complements your kitchen cabinetry.
Paint works well for a clean, modern look, while stain highlights natural wood grain for a warmer feel. Use at least two coats and allow proper drying time.

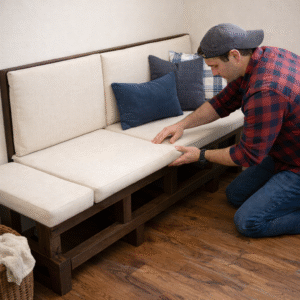
Step 8: Add Cushions and Seating Comfort
Use high-density foam cut to size for the bench. Upholster with durable, easy-to-clean fabric.
Secure cushions with Velcro strips so they don’t slide but can still be removed for cleaning.
Step 9: Place the Table and Lighting
Choose a table size that allows easy movement in and out of the nook. Round or oval tables work best in tight spaces.
Pendant lighting or a wall sconce above the nook enhances the cozy atmosphere and makes the space feel intentional.
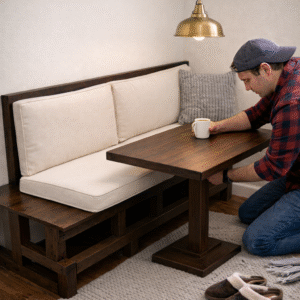
Styling Your Breakfast Nook
Styling transforms a simple bench into a design feature.
Add throw pillows for texture and color. Use a small rug under the table to define the area. If your nook is near a window, light curtains or Roman shades complete the look without overwhelming the space.
Frequently Asked Questions
How much does it cost to build a DIY breakfast nook?
Most DIY breakfast nooks cost between $200 and $500, depending on materials, cushions, and finishes.
Can beginners build a breakfast nook?
Yes. With basic tools and careful measurements, this project is beginner-friendly.
Do breakfast nooks need to be attached to the wall?
Wall attachment isn’t mandatory but is highly recommended for safety and durability.
What wood is best for a breakfast nook?
Plywood combined with 2×4 framing offers strength, affordability, and easy finishing.
Can I build a breakfast nook in a small kitchen?
Absolutely. Corner nooks and slim benches are perfect for small kitchens and apartments.
Conclusion
Building a breakfast nook is a rewarding DIY project that adds charm, comfort, and value to your home. With thoughtful planning, simple materials, and a step-by-step approach, you can create a custom seating area that fits your lifestyle and space perfectly. Whether you’re enjoying quiet mornings or family meals, a well-built breakfast nook quickly becomes one of the most loved spots in the home.