

Hornets nests are more than just an outdoor nuisance. They pose real safety risks to homeowners, families, and pets. A single nest can house hundreds of aggressive insects capable of repeated stings, and disturbing one without proper knowledge can lead to serious injuries.
Knowing how to identify hornets nests, understand their dangers, and remove them safely helps protect your home and outdoor spaces. LivinHint shares practical, clear guidance so homeowners can recognize warning signs early and choose the safest solution, whether through careful DIY steps or professional help.
What Is a Hornets Nest?
A hornets nest is a paper-like structure built by hornets using chewed wood fibers mixed with saliva. The result is a strong, layered shell that protects the colony inside.
Hornets build these nests to shelter their queen, eggs, and workers. The nest also serves as a defense system, allowing hornets to respond quickly if they sense danger. Unlike bees, hornets can sting repeatedly, which makes their nests especially risky around homes.
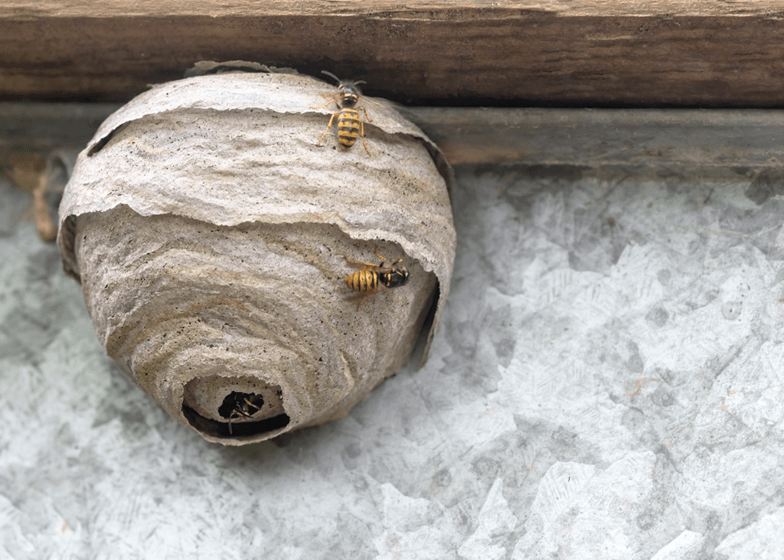
Hornet Nest Identification
Hornet nests have a distinct appearance that makes them easier to identify than other insect nests. They often look like large gray or brown paper balls with swirling patterns.
You may also notice heavy hornet activity around one specific area of your home or yard. Hornets usually fly in and out of a single opening near the bottom of the nest. A constant buzzing sound near eaves, trees, or sheds often signals an active nest nearby.
Types of Hornet Nests
Hornets build different nest types depending on species and location.
Aerial nests hang from trees, roof eaves, or utility poles. These are the most visible and can grow very large over time. Ground nests sit in hollow trees, wall voids, or underground spaces, making them harder to detect. Some hornets also build nests inside attics, garages, or sheds where warmth and shelter are available.
Each type presents unique risks, especially when hidden from view.
Where Hornets Build Nests
Hornets choose nesting locations that offer protection from weather and predators. Common locations include roof overhangs, soffits, tree branches, dense shrubs, sheds, attics, and wall cavities.
They prefer quiet areas with little disturbance. Homes near wooded areas, gardens, or water sources are more likely to attract hornets. Once established, hornets often return to similar spots each year if conditions remain favorable.
Hornet Nest Size and Maximum Population
Hornet nests start small but can grow rapidly within weeks. A mature nest can reach the size of a basketball or larger.
Some nests house between 100 and 700 hornets by late summer. As the population grows, hornets become more defensive. Larger nests increase the risk of multiple stings if disturbed, making early detection and action extremely important.
Dangers of Hornet Nests
Hornet nests pose serious safety risks. Hornets aggressively defend their nests and attack in groups when threatened.
Their stings are painful and can cause swelling, severe allergic reactions, or even life-threatening anaphylaxis. Children, pets, and elderly individuals face higher risks. Nests built near doors, patios, or play areas increase the chance of accidental encounters.
Structural damage can also occur when nests form inside walls or attics.
How to Get Rid of a Hornet Nest – Detailed Overview
Removing a hornet nest requires caution, planning, and the right approach. The level of risk depends on nest size, location, and hornet activity.
Small nests in early stages may allow for careful removal, while large or hidden nests often require professional intervention. Attempting removal without preparation can provoke aggressive attacks and result in serious injury.
Step 1: Gather Your Safety Equipment
Get a bee suit from Amazon (around $24 with gloves). Choose tan/coffee color as white gets dirty quickly. This protective gear is essential for safe removal.
Step 2: Prepare Your Tools
You’ll need a bucket to collect the nest and insecticide of your choice. Options include a duster with Dijon dust, Raid, Spectracide, or Hot Shot spray.
Tip: A duster allows closer application, while sprays let you treat from 20 feet away for extra safety.
Step 3: Put On Protective Gear
Wear your bee suit completely before approaching the nest. Ensure all areas are covered, including gloves, to prevent any stings.
Step 4: Treat the Nest with Insecticide
Apply your chosen insecticide directly to the nest entrance. The hornets will start reacting immediately and become disoriented.
Step 5: Wait 2-3 Minutes
Give the insecticide time to work. You’ll notice hornets dropping and becoming less active. Wait until swarming has mostly ended.
Note: The dust makes hornets disoriented and they may attack each other during this phase.
Step 6: Cut Down the Nest
Use cutters to carefully remove the nest from its location and place it in your bucket. Most hornets should be dead or dying by this point.
Step 7: Clean Up the Area
Remove dead hornets from the ground and surrounding area. Dispose of the nest and dead insects properly.
Tip: Total removal time is about 10 minutes, costs around $50 in supplies, and is completely safe when done with proper protective equipment.
Safety Precautions Before Any Removal
Safety should always come first. Hornets react quickly to vibrations, noise, and sudden movements.
Always wear thick protective clothing that covers your entire body. Avoid bright colors and strong scents that attract hornets. Plan removal during nighttime or early morning when hornets are less active. Keep children and pets far away from the area during any removal attempt.
Never attempt removal if you are allergic to insect stings.
DIY Removal Steps (For Small, Accessible Nests Only)
DIY removal should only be considered for small nests located far from living spaces.
Start by using a hornet-specific insecticide spray designed for long-range application. Apply it at night when hornets are inside the nest. Follow product instructions carefully and allow sufficient time for the treatment to work.
After confirming no activity, carefully remove the nest using a long tool and place it in a sealed bag. Dispose of it according to local guidelines. Never knock down a nest without treating it first.
Professional Hornet Nest Removal
Professional removal is the safest option for most situations. Trained technicians have protective gear, specialized equipment, and experience handling aggressive hornets.
Professionals can safely access high locations, wall cavities, and large nests. They also ensure complete removal, reducing the risk of hornets returning. Hiring experts minimizes injury risk and prevents accidental property damage.
Prevention Tips to Avoid Future Hornet Nests
Preventing hornets nests starts with reducing attractive nesting spots.
Seal cracks and openings around your home. Keep eaves, soffits, and vents well-maintained. Trim trees and shrubs away from structures. Remove food sources such as open trash, fallen fruit, or sugary spills.
Early spring inspections help catch small nests before they grow.
Frequently Asked Questions
How long does a hornet nest last?
Most hornet nests last one season. Colonies die off in late fall, but new queens may return the following year.
Should I remove an inactive hornet nest?
Yes. Even inactive nests should be removed to prevent reuse and discourage new colonies.
Can hornets return after nest removal?
Yes, especially if attractants remain. Proper sealing and prevention reduce return risks.
Is it safe to spray a hornet nest during the day?
No. Daytime spraying increases aggression and sting risk.
Are hornets protected insects?
In most areas, hornets are not protected, but local regulations may vary.
Conclusion
Hornets nests pose serious risks when left untreated, especially near homes and outdoor living areas. Early identification, understanding nest behavior, and choosing safe removal methods protect both people and property. While small nests may allow careful DIY handling, larger or hidden nests require professional removal for safety.
LivinHint encourages homeowners to act early, prioritize safety, and take preventive steps to keep outdoor spaces secure and comfortable year-round.